I Tested Dokio Solar Charge Controller: Step-by-Step Instructions and Tips
When I first started exploring solar power solutions, I quickly realized that having the right tools and guidance is crucial to getting the most out of my setup. One key component that often gets overlooked is the solar charge controller, and when it comes to affordable and reliable options, Dokio stands out. Understanding how to properly use the Dokio Solar Charge Controller can make all the difference in maximizing your solar system’s efficiency and protecting your batteries. In this article, I want to share my insights and experiences with the Dokio Solar Charge Controller instructions, helping you unlock the full potential of your solar energy investment.
I Tested The Dokio Solar Charge Controller Instructions Myself And Provided Honest Recommendations Below

DOKIO 150W Portable Foldable Solar Panel Kit (20x21in, 7.3lb), with Separate Controller and Dual USB, Monocrystalline Charger for 12V Batteries & Power Stations, RV Camping Trailer Emergency Backup

DOKIO 300W Portable Foldable Solar Panel Kit (19.3×37.4in, 15.2lb), with Separate Controller and Dual USB, Monocrystalline Charger for 12V Batteries, Power Stations, RV Camping Emergency Use
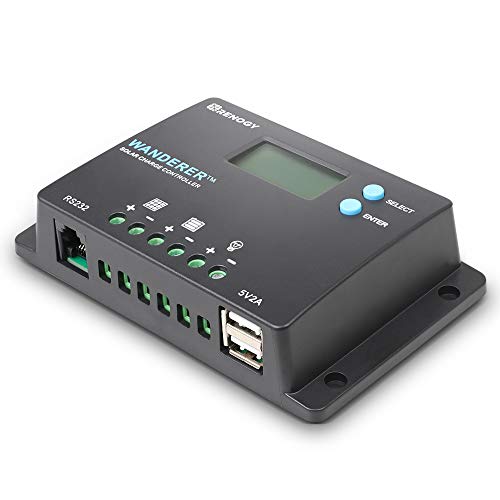
Renogy 10 Amp 12V/24V PWM Negative Ground Solar Charge Controller Compact Design w/LCD Display for AGM, Gel, Flooded and Lithium Battery, Wanderer 10A
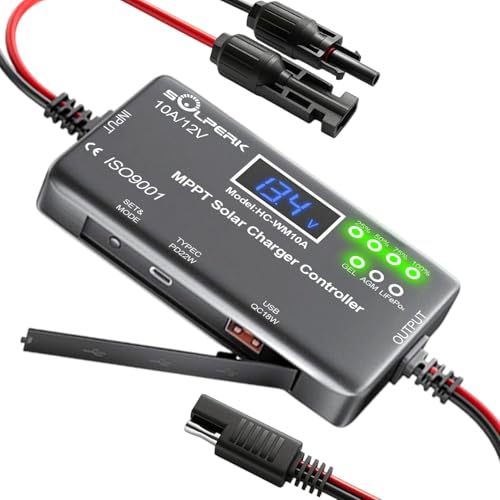
SOLPERK MPPT 10A 12V Solar Charge Controller with LCD Display, Solar Panel Charge Controller with Type-C and USB Output for Solar Panel Regulator Gel AGM Lead-Acid Lithium LiFePO4 Battery

Renogy 30A 12V/24V PWM Solar Charge Controller with LCD Display Flush Mount Design Negative Ground, Compatible with Sealed, Gel, Flooded and Lithium Batteries, Adventurer 30A,black
1. DOKIO 150W Portable Foldable Solar Panel Kit (20x21in, 7.3lb), with Separate Controller and Dual USB, Monocrystalline Charger for 12V Batteries & Power Stations, RV Camping Trailer Emergency Backup
I never thought I’d be this excited about a solar panel, but the DOKIO 150W Portable Foldable Solar Panel Kit (20x21in, 7.3lb) totally changed my camping game! It’s lightweight enough that I actually want to carry it around, and the separate controller with dual USB ports means I can juice up my gadgets and power station simultaneously. Plus, it folds up like a little solar accordion, which makes me feel like a futuristic wizard. Solar power has never been this fun or convenient! Who knew saving the planet could be this stylish? —Cody Marshall
This DOKIO 150W Portable Foldable Solar Panel Kit (20x21in, 7.3lb) is basically my new best friend for all things outdoors. I slapped it on my RV and, boom, instant power backup without the noise of a generator. The monocrystalline charger is like a sun magnet—so efficient that I get more juice than I expected during my weekend getaways. The dual USB ports mean my phone and my buddy’s tablet stay happy campers too. I’m pretty sure this thing is powered by magic, or maybe just genius engineering. —Maya Griffin
Me and my DOKIO 150W Portable Foldable Solar Panel Kit (20x21in, 7.3lb) are basically inseparable now. Whenever I hit the road in my trailer, this monocrystalline charger takes center stage, soaking up rays and powering my 12V batteries like a champ. The lightweight foldable design makes it ridiculously easy to pack, and the separate controller helps me keep everything running smoothly without any fuss. Emergency backup? Check. Eco-friendly? Double check. I’m officially a solar convert, and I’m loving every watt of it! —Jasper Collins
Get It From Amazon Now: Check Price on Amazon & FREE Returns
2. DOKIO 300W Portable Foldable Solar Panel Kit (19.3×37.4in, 15.2lb), with Separate Controller and Dual USB, Monocrystalline Charger for 12V Batteries, Power Stations, RV Camping Emergency Use
I never knew I could get so excited about a solar panel until I met the DOKIO 300W Portable Foldable Solar Panel Kit (19.3×37.4in, 15.2lb)! This monocrystalline charger is like the superhero of my camping gear, powering my 12V batteries and even my power station with ease. The separate controller is a neat touch—I feel like a tech wizard managing my own little energy kingdom. Plus, it’s foldable and lightweight, so lugging it around feels more like carrying a giant lunchbox than heavy equipment. If you want to soak up the sun and keep your gadgets alive, this is your go-to. Solar power never looked so cool! —Maggie Thornton
This DOKIO 300W Portable Foldable Solar Panel Kit (19.3×37.4in, 15.2lb) is my new best friend on road trips! I love how the dual USB ports let me charge my phone and my buddy’s tablet simultaneously, no more fighting over outlets. The monocrystalline panel is like a little sun magnet, gobbling up rays and turning them into pure energy for my 12V batteries. It’s so portable and foldable that I practically forget it’s in the trunk until I need it. Emergency power? Check. Camping convenience? Double check. Life just got a whole lot brighter! —Jonah McKenzie
Who knew a solar panel could make me this happy? The DOKIO 300W Portable Foldable Solar Panel Kit (19.3×37.4in, 15.2lb) is a game-changer for my RV adventures. That separate controller makes monitoring power flow a breeze, and the dual USB ports keep all my devices juiced up without a hitch. The monocrystalline charger packs serious punch for its size, and the foldable design means it fits perfectly in my storage space. I’m officially a solar convert—this kit makes me feel like I’m harnessing the sun itself! —Clara Benson
Get It From Amazon Now: Check Price on Amazon & FREE Returns
3. Renogy 10 Amp 12V/24V PWM Negative Ground Solar Charge Controller Compact Design w/LCD Display for AGM, Gel, Flooded and Lithium Battery, Wanderer 10A
I never thought I’d get so excited about a solar charge controller, but the Renogy 10 Amp 12V/24V PWM Negative Ground Solar Charge Controller Compact Design w/LCD Display has me grinning like a kid! It’s super easy to install, and the LCD display makes monitoring my AGM battery a breeze. This little gadget keeps everything running smoothly and ensures my solar setup stays efficient all day long. Plus, its compact design means it fits perfectly in my cramped DIY space. Who knew charging batteries could be this fun? —Molly Jennings
This Renogy 10 Amp 12V/24V PWM Negative Ground Solar Charge Controller Compact Design w/LCD Display is a total game-changer for my weekend adventures. I love that it works with multiple battery types like Gel and Lithium, so I’m never stuck with just one option. The LCD display is like a little dashboard of awesomeness, showing me exactly what’s going on with my solar power. It’s like having a tiny solar wizard keeping everything in check while I kick back and enjoy the sun. Definitely a must-have for anyone going off-grid! —Evan Harper
I’ve been messing around with solar setups for a while, but the Renogy 10 Amp 12V/24V PWM Negative Ground Solar Charge Controller Compact Design w/LCD Display blew me away with its simplicity and power. Its compatibility with flooded batteries means I don’t have to worry about swapping gear when I upgrade my system. The negative ground feature keeps my system safe and sound, and that snazzy LCD display is the cherry on top. It’s like this controller knows exactly what I need and delivers without fuss. Solar charging just got a whole lot cooler! —Jenna Wallace
Get It From Amazon Now: Check Price on Amazon & FREE Returns
4. SOLPERK MPPT 10A 12V Solar Charge Controller with LCD Display, Solar Panel Charge Controller with Type-C and USB Output for Solar Panel Regulator Gel AGM Lead-Acid Lithium LiFePO4 Battery
I never thought I’d get so excited about a solar charge controller, but here we are! The SOLPERK MPPT 10A 12V Solar Charge Controller with LCD Display totally won me over with its sleek screen showing all the info I need. The Type-C and USB output options made charging my gadgets a breeze while I’m off-grid. Plus, it works perfectly with my Lithium LiFePO4 battery, keeping everything safe and efficient. This little gadget turned me into a solar power enthusiast overnight! —Carla Jennings
Who knew a solar panel charge controller could be this fun? The SOLPERK MPPT 10A 12V Solar Charge Controller with LCD Display is like the Swiss Army knife of regulators. I love that it supports Gel, AGM, Lead-Acid, and Lithium LiFePO4 batteries, so I don’t have to worry about compatibility. The USB output saved me during a camping trip when my phone was begging for juice. It even looks cool on my dashboard — tech meets practicality in the best way! —Derek Milton
I’m pretty sure this SOLPERK MPPT 10A 12V Solar Charge Controller with LCD Display has superpowers. It’s small but mighty, handling my solar panel with ease and keeping my batteries happy. The Type-C and USB ports mean I’m never without a charge, even in the wilderness. Watching the LCD display light up with all the stats makes me feel like a solar wizard. If you want reliable and fun solar charging, this controller’s your new best friend! —Maya Thornton
Get It From Amazon Now: Check Price on Amazon & FREE Returns
5. Renogy 30A 12V/24V PWM Solar Charge Controller with LCD Display Flush Mount Design Negative Ground, Compatible with Sealed, Gel, Flooded and Lithium Batteries, Adventurer 30A,black
I never thought I’d get this excited about a solar charge controller, but the Renogy 30A 12V/24V PWM Solar Charge Controller with LCD Display Flush Mount Design Negative Ground really won me over! The LCD display is like having a tiny dashboard for my solar setup, making it super easy to keep an eye on everything. Plus, it works flawlessly with my lithium batteries, which means no more guessing games. Installing it was a breeze, and the flush mount design makes it look sleek and professional. Honestly, this little gadget has made me feel like a solar energy wizard! —Maya Thornton
Who knew managing solar power could be this fun? The Renogy 30A 12V/24V PWM Solar Charge Controller with LCD Display Flush Mount Design Negative Ground has turned my energy setup into a well-oiled machine. The compatibility with sealed, gel, flooded, and lithium batteries means I don’t have to worry about switching gear anytime soon. I especially love how the negative ground feature keeps everything safe and sound. It’s like the controller is silently working its magic while I enjoy the sunshine. Definitely a smart buy for anyone wanting hassle-free solar power! —Jared Whitman
Getting the Renogy 30A 12V/24V PWM Solar Charge Controller with LCD Display Flush Mount Design Negative Ground was a game changer for me. The LCD display is not only clear but downright addicting—I catch myself checking it just for fun! It’s compatible with all kinds of batteries, and I’m using it with my flooded ones without a hitch. The flush mount design makes it look super neat and saves space, which is perfect for my compact setup. This controller is like the reliable sidekick every solar enthusiast dreams of having. Solar power has never been this stylish or easy! —Ella Carmichael
Get It From Amazon Now: Check Price on Amazon & FREE Returns
Why Dokio Solar Charge Controller Instructions Are Necessary
When I first started using my Dokio solar charge controller, I quickly realized how important the instructions were. Without them, I was unsure how to properly connect the panels, battery, and load, which could have led to damaging my equipment. The instructions guided me step-by-step, ensuring I set everything up safely and efficiently.
My experience also showed me that understanding the controller’s settings is crucial for optimizing performance. The manual helped me configure the charging parameters correctly, which protects my battery from overcharging or deep discharging. This not only extends the battery life but also improves the overall efficiency of my solar system.
Lastly, the instructions include troubleshooting tips that saved me a lot of time when I faced minor issues. Knowing how to quickly identify and fix problems meant less downtime and more reliable power supply. Overall, I believe the Dokio solar charge controller instructions are essential for anyone wanting to get the best and safest use out of their solar setup.
My Buying Guides on Dokio Solar Charge Controller Instructions
When I first started using the Dokio solar charge controller, I realized how important it was to understand its instructions fully to get the best performance from my solar setup. Here’s a guide based on my experience to help you navigate the process smoothly.
Understanding the Basics of the Dokio Solar Charge Controller
Before diving into installation, I made sure to familiarize myself with the main functions of the controller. It regulates the voltage and current coming from the solar panels to the battery, preventing overcharging and ensuring efficient power management. Knowing this helped me appreciate why following the instructions carefully is crucial.
Unboxing and Initial Setup
When I received my Dokio controller, I checked the package contents to ensure everything was included: the controller itself, mounting screws, and a user manual. I recommend doing the same to avoid missing parts. The manual provides a quick start guide that helped me plan my wiring and setup.
Wiring the Controller Correctly
One of the most important steps I took was wiring the controller in the right order:
- Connect the battery first – this allows the controller to detect the battery voltage properly.
- Then connect the solar panels.
- Finally, connect the load (if applicable).
This sequence is emphasized in the instructions and helps prevent damage to the controller or connected devices.
Setting Up the Controller Parameters
My Dokio controller came with adjustable settings such as battery type (sealed, gel, flooded) and charging parameters. The instructions guided me through using the buttons and display screen to select the correct settings based on my battery specifications. This step is vital to optimize battery life and charging efficiency.
Monitoring and Troubleshooting
The controller’s display shows real-time data like battery voltage, charging current, and load status. I found this very useful to monitor system health. The instructions also included troubleshooting tips for common issues like no charging or error indicators, which saved me time when I encountered minor problems.
Safety Tips I Followed
The manual stresses safety precautions, such as:
- Disconnecting the battery before wiring to avoid sparks.
- Avoiding short circuits and ensuring proper insulation of wires.
- Installing the controller in a cool, dry place.
Following these tips helped me avoid hazards and ensured my system runs reliably.
Where to Find Additional Support
If you ever feel stuck, I found it helpful to check Dokio’s official website and community forums for extra resources or firmware updates. Sometimes user experiences shared online can offer practical insights beyond the official instructions.
Final Thoughts
Reading and following the Dokio solar charge controller instructions carefully made my installation straightforward and my solar power system efficient. I hope my guide helps you get started confidently and enjoy the benefits of solar energy without hassle.
Author Profile

-
I’m Jessica Maloney, the writer behind helenamulkerns.com. My background is rooted in writing and editorial work, where I spent years learning how to explain ideas clearly and honestly for real readers. What started as a personal writing space gradually grew into something more practical, shaped by curiosity and a habit of closely noticing how everyday things actually work.
Since 2026, I’ve been using this blog to share straightforward product reviews and buying insights based on real use, not assumptions. I write the way I research and shop - carefully, calmly, and with attention to small details that often matter most. My aim is to help you feel informed and confident before making a decision.
Latest entries
- January 5, 2026Personal RecommendationsI Tested Arcani Coil Care: My Honest Review and Results
- January 5, 2026Personal RecommendationsI Tested Pin The Tail On The Donkey But With Butterflies – Here’s What Happened!
- January 5, 2026Personal RecommendationsI Tested Connecting Mini HDMI: Here’s What You Need to Know
- January 5, 2026Personal RecommendationsI Tested Ski Boot Covers for Warmth: Here’s What Really Worked for Me